I wanted to create something for my cousin Kennedy's 7th Birthday this past weekend. She's of the tom-boyish sort so I was having difficulty thinking of what she might like. After a quick conversation with my Aunt Patti (Kennedy's Mom) I decided to make her a little zippy-pouch purse like I had made her sister Alison a year ago. It turned out beautifully!
I also created a cute little drawing book for her to doodle around in:
 |
| Finished Product: Zippy-Pouch, Personalized Notebook, & Pencil |
TO MAKE A ZIPPY POUCH PURSE:
First you need to assemble all your materials you will be needing:
- 1 Zipper (I used a 7 inch zipper.)
- 4 Equal sized fabric squares or rectangles. 2 for the lining, 2 for the outside. Cut to the full size as your zipper (This will make everything niiiice and eeasy).
- Other essentials: Thread. Scissors. Sewing Machine.
Now place your zipper edge to edge with the lining:
2. Take one piece of your outside fabric and lay face down, edge to edge with your lining and zipper.
So you're actually making a sandwich: lining face up, zipper, outside face down.
Pin together BELOW your zipper teeth. (You don't want to get stuck in your sewing machine, do you?).
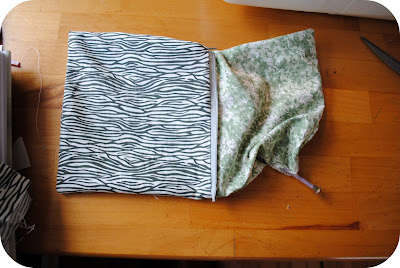
3. Pull both pieces of fabric back, revealing zipper again. Repeat EXACTLY as you did already: fabric lining face up, zipper, outer face down. sew together. What you get should look like this:
4. Invert each matching side together: OUTER TO OUTER/ LINER TO LINER. Unzip the zipper at least HALF WAY (Don't forget or you'll have a really tough time trying to turn out your pouch).
Pin the middle with teeth facing lining side. You can match the ends together and press with an iron, if you like.
Line up all your sides. With a 1/4" seam allowance, start sewing at the bottom of your liner. Go up and all around in one large rectangle. Stop 2" from where you started.
5. Through the 2" hole, walk your fingers inside to grab one of the inside corners of your outer fabric. Pull all the way through inverting everything.
 |
| Use a knitting needle to straighten out your corners. |
6. Sew up your 2" opening. Tuck in the lining and give yourself a pat on the back- You've officially finished your Zippy-Pouch Purse! Now go fill it up with pencils, pens, make-up, notepads, money.... :)
{NOTE} If you'd like to embellish or monogram your pouch, you should definitely do this right between steps 3 and 4. That way, any threads or knots will be all sewn inside and invisible to the eye!
For the monogrammed letter I used a 40% wool felt applying it with Heat-n-Bond adhesive, like an applique. Then I used french knots to embellish and keep the letter on completely and securely (I don't totally trust heat-n-bond by itself). Tie a ribbon to the zipper tab. Voila! Fancy-Shmancy.
I hope you've found my directions easy to fallow. And! I'd love to see how yours turned out :)
Happy Crafting!
♥


such a sweet idea!
ReplyDeleteThis is great. I love making stuff for my nieces and nephews. Just found your blog thru Etsy blog team discussion and following now :)
ReplyDeleteSo cute! thanks for sharing! I have 3 kids and they all prefer pens and paper over toys any day! :)
ReplyDeleteThanks again for your tutorial! I used it today to make a batik zipper bag as a give away for my 100th fan on my face book page. I shared a link to your blog. :)
ReplyDelete www.facebook.com/pages/Mojo3777creations